Saturday, November 2, 2013

Water Bottle Carrier

tote5Water Bottle Carrier

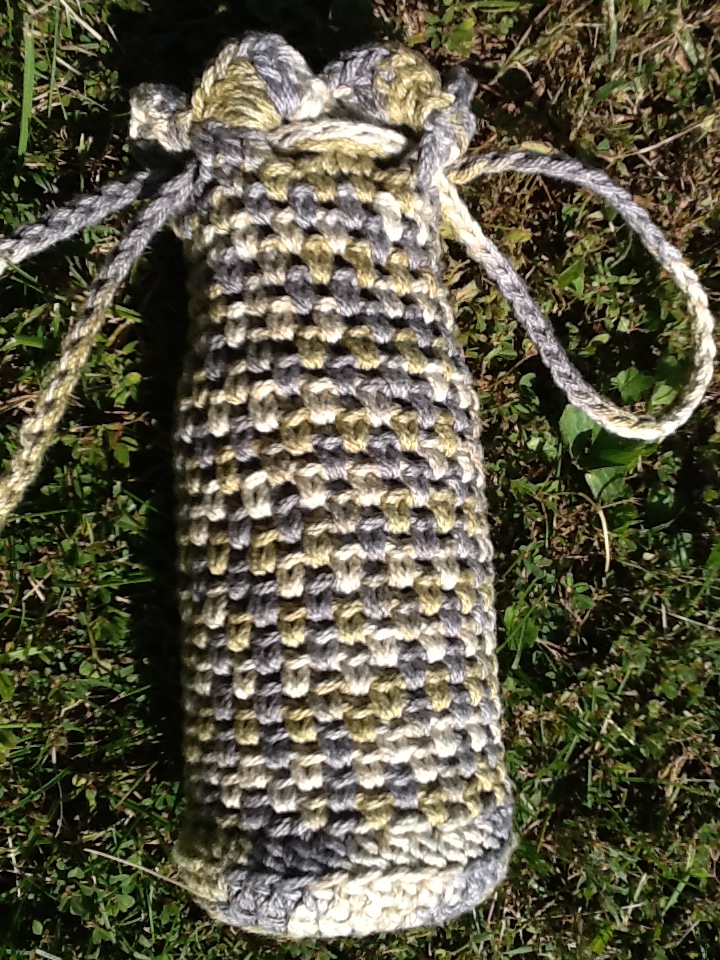
This striking carrier adds practicality  and style to your water bottle.  Use either one drawstring strap over your shoulder or both around your wrist.  No more water bottle sweat in your purse!  Convenient to carry and a breeze to whip up!

You’ll need:

  • 1 skein of Fantasy Naturale, or aran weight yarn of your choice (plant fiber recommended)

  • Size H crochet hook

  • Stitch markers

  • Tapestry needle (for weaving in ends)


 Finished Measurements

8.5” tall, bottom = 3.5” diameter

Gauge

Pattern: *1 sc, ch 1* repeat.  Make sc in ch 1 space of previous row.

4” = 7 [sc, ch 1] of mesh pattern

4” = 15 rows of mesh pattern

Pattern Notes

  • In a reverse slip knot, the tail of the yarn tightens the loop.  Do this by: 1) reversing the way you normally tie a slip knot, or 2) pull the tail through to complete the final step, rather than the working yarn.

  • Hdcbl = half double crochet through the back loop only of the stitch


 tote4Crochet the Base

1. Make a reverse slip knot (see pattern notes) or magic ring.  Draw up a loop through the center of the slip knot or ring.

2. Hdc 12 into the center of the knot or ring, join to 1st hdc with a slip stitch.  Tighten the ring.  (12 sts)

3. Ch 1, hdc in st below (1st stitch from last round), *2 hdc in next st, 1 hdc in next; repeat from * to * around, ending with 2 hdc in last st.  Join to 1st stitch with a slip stitch.  Place a marker, and continue to move it at end of each round.  (18 sts)

4. Ch 1, hdc in st below, *1 hdc in next st, 2 hdc in next st, 1 hdc in next; repeat from * around, ending with 2 hdc in last st.  Join as above.  (24 sts)

5. Ch 1, hdc in st below,*1 hdc in next 2 sts, 2 hdc in next st, 1 hdc in next; repeat from * around, ending with 2 hdc in last st.  Join as above.  (30 sts)

6. Ch 1, hdc in st below,*1 hdc in next 3 sts, 2 hdc in next st, 1 hdc in next; repeat from * around, ending with 2 hdc in last st.  Join as above.  (36 sts)

7. Ch 1, hdcbl in each stitch around.  Join to 1st stitch with a slip stitch.

Body

1. Ch 1, *sc, skip 1 stitch, ch 1; repeat from * around.  Join to 1st stitch as above.

2. Ch 1, *sc in ch 1 space below, skip 1 st, ch 1; repeat from * around.  Do not join.

3. Continue to work step 2 of mesh pattern around in a spiral until work measures 7.5” from base.  (Option: To fit a wine bottle, keep crocheting body longer.)

 Drawstring Eyelets

Ch 2, 1 dc in next 2 sts, ch 2, skip 2, *1 dc in each of next 3 sts, ch 2, skip 2; repeat from *.  Join with a slip stitch to first ch 2.

 Scalloped Top

Skip 3 dc.  *sl st 1 in next ch 2 space, work [3 dc, ch 1, 3 dc] in same ch 2 space; repeat from * around.  Sl st to 1st sl st to anchor.  Break yarn and finish off.

Straps

1. Ch for 36 inches.  Do not break yarn.  Weave chain through the eyelets of the bag.  Join chain with a sl st to work in the round, (be careful not to twist).

2. Sl st through back bump of each ch around.  Finish off.

Weave in ends, wet, and block around a bottle.Tote1

tote3tote6


© 2013 Slippery Woods Designs by Sara Farmer.  Pattern may be used freely, but please include a link or notation back to slipperywoodsdesigns.com


Wednesday, October 23, 2013

Tunis Wrap

Tunisian crochet - the knitter's crochet!  This wrap is the Tunisian Resolution scarf pattern by Cathy Johnson of Cat's Tale.  You can find the original pattern here.  Here are my adaptations to convert the lovely scarf into a dazzling wrap.

You'll need:

- Size L crochet hook with extended cable

- 3 skeins Cleo by Plymouth Yarn, 100% mercerized cotton  (or 375 yards DK weight yarn of equivalent fiber)

Adapting the Measurements

- Gauge: 3 pattern repeats = 3.5"

- You will make 10 pattern repeats.  Therefore, chain 43 to begin (10 x 4 + 1 + 2).

- Finished measurements: 45" long, 11.5" wide

- Once you've reached 45", bring edges together with a twist.  (turn one end upside down)  Seam together with a backstitch seam.  (See tutorial here.)

You can also double this around your neck for a full and gorgeous cowl.

Tuesday, October 8, 2013

Bloomingtails Scarf

Bloomingtails 2BloomingtailsBloomingtails3


This simple design capitalizes on the innovative beauty of the Bloom yarn.  The yarn does the work for you!  Crochet this striking scarf in one relaxing evening.


You’ll need:


  • 1 skein of “Bamboo Bloom Handpaints” by Universal Yarn

  • Size I crochet hook

  • Tapestry needle


Finished Measurements


40” long, 3.5” wide (tube)


Pattern Notes


  • You will crochet a strip, then seam it together to form a tube.  Then you will attach fringe to the seam.  To wear, pull the fringe through the tube.

  • The tube is crocheted in linen stitch.  To make the linen stitch, you will alternate crocheting in the back and front loops of the stitch.


Abbreviations


  • Ch: chain

  • Sc: single crochet

  • Blsc: crochet through the back loop only of the stitch

  • Flsc: crochet through the front loop only of the stitch

  • St: stitch


Crochet the Tube


1. Chain 15.


2. Sc in each stitch across (14 sts)


3. Ch 1.  *blsc in next st, flsc in next st.  Repeat from * to end of row.  Turn.


4. Repeat row 3 until piece measures 8”.


5. Seam short ends together, creating the tube.


Make the Fringe


1. Cut 50 pieces of yarn 2 yards long.  (I find it easiest to cut a 2 yard piece of different yarn to use as a template.)


2. Attach fringe in 5 groups of 10 pieces evenly spaced across the seam of the tube.


3. Knot the end of each piece of fringe for a more finished look.


Block, wrap around your neck, and pull fringe through the tube.  Luscious and easy!


Click Bloomingtails Scarf here for printable version.

Wednesday, September 25, 2013

Cavalier Scarf Class

Cavalier Red


Planning to make this scarf?  Come join with others!  Tuesday, October 8th, 6-7:30, $10.  Learn more at yarnsunlimited.com/classes.html.  See you there!

Tuesday, September 17, 2013

tunisian resolution wrap

DSCN1006Tunisian Resolution - not mine

Join me this Sunday, Jan. 18th to make this beautiful, lacy wrap or scarf!

Sunday, January 18th, 1:00-3:00
Yarns Unlimited, Bloomington IN


If you've done the simple Tunisian crochet stitch and you're ready for another variation, try this other Tunisian crochet stitch and create a scarf, wrap, or cowl--width and length may be adapted to suit your own preference.


Friday, September 13, 2013

Bonfire Cowl


DSCN1015


Cool air is blowing!  Snuggle up with this cozy, stylish, and chunky cowl.  This cowl hugs your neck with warmth and style perfect for Autumn's chill.  It is crocheted with a high quality wool/acrylic blend yarn.  It is warm and eye-catching, yet easy to wash.

You’ll need:

  • 3 skeins of “Combo” by Universal Yarn, or about 130 yards super bulky weight yarn (shown with 1 skein each of khaki, chocolate, and teal)

  • Size Q crochet hook

  • Stitch marker

  • Tapestry needle (for weaving in ends)


Gauge

3 rows x 6 sts = 4” x 5”

 Finished Measurements

34” circumference, 24.5” tall

 Pattern Notes

  • This cowl is crocheted simply by single crocheting in the round through the back loops only (abbreviated as blsc)

  • Rather than joining rounds with an extra slip stitch, you will join as you complete your last single crochet.


Crochet the Cowl

Ch 40 with first color.  Join to work in the round, being careful not to twist.

R1:  Ch 1.  sc in back bump of each chain until last chain.  Insert hook into last chain and draw up a loop.  Insert hook  through 1st stitch sc, draw up a loop, and pull through two all loops on hook.

R2-6:  Ch 1 (doesn’t count as 1st sc).  Blsc in 1st sc, place marker.  Continue blsc in each sc around.  Join to last sc as above.  (Continue to move marker to 1st sc in each round.)

R7:  Join next color.  Ch 1.  Blsc in 1st sc, place marker.  Continue blcs in each sc around.  Join to last sc as in row 1.

RR8-12:  same as rows 2-6.

R13:  same as row 7.

RR14-18: same as rows 2-6.

Finishing

Pull through last loop.  Weave in ends with tapestry needle.  Block as desired.

Printable version: Bonfire Cowl (see change above in round 1)

Want to make this with a group?  Join the class at Yarns Unlimited in November/December 2013!

© 2013 Slippery Woods Designs by Sara Farmer.  Pattern may be used freely, but please include a link or notation back to slipperywoodsdesigns.com

Thursday, September 12, 2013

Happy Hooking Beginning Crochet

Tuesdays 9/10 & 9/17, 6:00-8:00pm

This class will cover the basic crochet stitches and beyond.  You will have a chance to practice a variety of stitches and create a scarf.

Friday, August 23, 2013

cavalier scarf

Cavalier Scarf 

By Sara Farmer

Chunky, soft, and luscious!  This is an easy repeat that you’ll whip up in a jiffy.  Create an individualized accent for an afternoon out, or a last minute gift to fit anyone.  The scarf can be worn multiple ways—follow your mood!

344Cavalier Red

You’ll need:

  • 100-130 yards chunky yarn

  • Size P crochet hook

  • Buttons

  • Needle and thread

  • Tapestry needle to weave in ends

Gauge

4 pattern repeats = 4 inches (gauge is not crucial in this project)

Crochet the Scarf

R1: Ch
2021.

(Disregard strikethrough from here on out.  I can't seem to turn it off!)


R2: Sc in 2nd chain from the hook and each chain across.

R3: Ch 3, turn.  Skip 1st sc, sc in next sc *ch2, skip 1 sc, sc in next sc*.  Repeat from * to * until end.

R4: Ch 3, turn.  Sc in ch 2 space below, *ch 2, sc in ch 2 hole* to end.

Repeat row 3 until desired length.  Turn.

Last row: Ch 1.  sc in each sc and ch 2 space across.

Finish off, weave in ends.

Sew buttons along short edge.

Cavalier Scarf Printable Version. Be sure to change the beginning chain to 21 instead of 20!

malibu breeze loop

Malibu Breeze LongMalibu


Malibu Breeze Loop

By Sara Farmer

Wear this breezy necklace long and airy, or wrap it close for a chunkier look.  You’ll love the process and result of this quick and simple project!

You’ll need:

  • 2 skeins of Plymouth’s Linen Concerto, or 200 yards of dk yarn

  • Size G crochet hook

  • Stitch markers

  • Decorative button (for optional embellishment adapted from Tamara Kelly of mooglyblog.com)

  • Tapestry needle


Pattern Notes

  • To change the size of the loop, add or subtract a multiple of 17.

  • If adding the optional embellishment, save approximately 11 yards of yarn to crochet it or make it before you make the loop.

  • When making the initial chain, place a marker every 50 stitches to help yourself count chain stitches.

  • On round 2, it is helpful to place markers designating where you’ll dc.  Make the first 3 dc, skip 14 chains, place marker in the 15th.  Then *skip 16 chains, place marker in the 17th.*  Continue from * to * until loop is marked.  Then continue with pattern.


Crochet the Loop

R1: Ch 167, sl st to 1st ch to join the loop (be careful not to twist).

R2: Ch 2, dc through both loops (here and throughout round) of the 1st chain, then dc in next 2 chains.  (see 4th pattern note above) *ch 15, skip 14 chains below, dc in each of next 3 chains.*  Repeat from * to * until end.  Dc in  1st dc.  (NB: If you end the round with the wrong number of chains, don’t worry!  Still chain 15, then dc in the beginning dc.  Or add/subtract a chain or two to keep it from bunching.)

R3 till end: Continue working in  a spiral.  Dc in each dc from round below, chain 15 between.  Continue until you run out of yarn, get to desired width, or get distracted by your next project!  (don’t forget to save your 11 yards of yarn for the embellishment if you haven’t already)

Finishing: Tie off and weave in ends.  Block, dry, and wear!

NB: When you stop and restart, double check to make sure you’re going the right direction in the spiral.

Optional Button Embellishment

(adapted from pattern by Tamara Kelly of mooglyblog.com)

1.  Thread button onto the remaining yarn.  Chain for 10 inches.

2. Slip the button down close to the hook, and skipping over the button, sl st in the in the 2nd ch from the hook (trapping the button in the loop).  Sl st back along ch for approximately 1.75 inches, or until this sl st section is long enough to fit around cowl when doubled, with a little bit of tension.

3. Ch 7 sts, or long enough to create a loop that fits tightly around the button.  Sl st in the same ch as last sl st, sl st in next 2 ch.

4. Ch to slightly shorter than remaining unworked ch.  Break yarn and finish off ends.

5. To wear, slip button behind cowl and pull it toward the front.  Pass button through loop made in step 3.

Malibu Breeze Loop Printable Version

mariposa stole

Mariposa Stole
By Sara Farmer

These lovely butterflies will wrap you in elegance! Beading is optional, but accents the delicate bodies of the butterflies. The pima cotton/silk yarn provides a touch of warmth on a cool evening, while still cool enough for summer nights. You can choose to crochet armholes into the stole to slip it over your shoulders.

cropped-mariposa.jpg

Mariposa Stole

You’ll need:
 2 skeins of Misti Alpaca Tonos Pima Silk, or about 630 yards of dk yarn (solid color recommended)
 Size G crochet hook
 Stitch markers
 20 grams of 6/0 seed beads
 Beading needle
 Tapestry needle
Gauge
3dc + 1 butterfly = 3.5” long x 2.5” high
NB: The finished garment will stretch when worn. See finished measurements to make adjustments to size.

Finished Measurements

Stole is 20 butterflies long and 7 butterflies tall. With some stretch, this measures 18” wide x 82” long finished.

Pattern Notes

- The butterflies are created by a 6 row repeat. The first 5 rows repeat a 3 dc, chain 15 pattern. In the 6th row, you will chain half the row, then use a sc to bind the chains of the 5 previous rows together, then complete the chain. You’ll crochet the beads in place on this single crochet.

- The optional armholes happen after the third row of butterflies. Make note before you plunge forward!

- A note on joining yarn balls. Be sure to join at a double crochet section, not along the chains. Also remember to restring enough beads on the new ball to finish the project.

- To change the size, add or subtract a multiple of 18 from starting chain.

Prepare the Beads

String about 160 beads or 11 grams of beads onto the 1st ball of yarn

Crochet the Stole

R1: Chain 365, placing marker every 50 chains as you go to help count.
R2: Starting from 2nd chain from the hook, place marker every 18 chains until 3 chains left. Returning to the begin-ning of the row, dc in 2nd ch from hook, and in next 2 chains. *ch 15, dc in next 3 dc after the marker.* Repeat from * to * until end of row.
R3: Ch 2, turn. Dc in each of next 3 dc. *ch 15, skip 15 chains below, dc in next 3 dc.* Repeat from * to * until end of row.
R4-5: Same as row 2
R6: Ch 2, turn. Dc in each of next 3 dc. *Ch 7, slide a bead close to the hook. Gather the 5 rows of chains from be-low, insert your hook underneath them, and draw up a loop underneath the 5 chains. Slide the next bead up snugly against the working stitch. Yarn over and draw through both loops on the hook. (NB: Beads will appear on the opposite side of the work.) Ch 7, dc in each of next 3 dc.* Repeat from * to * until end of row.
R7-11: Repeat row 2.
R12: Same as row 6.
Continue this 6 row repeat until you have 7 rows of complete butterflies (or 42 rows). Fasten off, and weave in ends.
This stole loves to be blocked, please do!

Optional Armholes
(inserted after you’ve completed the 3rd set of butterflies or 18 rows)

R19: Place a marker on the 1st dc after the 7th butterfly and the 1st dc after the 12th butterfly. Follow directions for row 2 until you reach the marker. Do not dc; chain 3 instead. Continue the pattern (ch 15, 3 dc) until you reach the next marker. Do not dc; ch 3 instead. Continue the pattern until the end of the row.
R20: Ch 2, turn. Dc in each of next 3 dc. *ch 15, skip 15 chains below, dc in next 3 dc.* Repeat from * to * 4 times. Ch 15, skip 15 chains below, dc in next 3 chains. *ch 15, skip 15 chains below, dc in next 3 dc.* Repeat from * to * 4 times. Ch 15, skip 15 chains below, dc in next 3 chains. *ch 15, skip 15 chains below, dc in next 3 dc.* Repeat from * to * end of row.
R21-23: same as row 2.
R24: same as row 6.
Remaining rows worked the same as rows 7-12.

Mariposa Stole Printable Version

chain cowl

Sunday, August 11, 2013

tunisian summer scarf

photo (5)

broomstick lace cuff

photo (8)photo (7)


Broomstick Lace Cuff


Yarn: 1 skein Seduce or Captiva  (1 skein will make more than 1 cuff)

Hook: size F

Broomstick: size Q/16mm or larger crochet hook =OR= size 35 or larger knitting needle (you’ll just need 1 needle) =OR= get crazy and try an actual broomstick!


Notions: tapestry needle, thread needle, thread, 3 small buttons


Foundation: chain 16

Row 1: sc in 2nd chain from hook, and in each chain to end. This is the right side. (15 sc)

Row 2: DO NOT CHAIN OR TURN.  Move yarn to back of work.  Working from left to right, draw up the loop currently on hook.  Place it on broomstick, and pull taut.  *Draw up a loop through back loop only of the next sc.  Place loop on broomstick.* Repeat from * to * until end of row.  (15 broomstick loops)

Row 3: DO NOT CHAIN OR TURN.  Move yarn to back of work.  Working from right to left, place hook through first 5 broomstick loops, and slide them off.  Draw up a loop through all 5 broomstick loops, then draw another loop through it (slip stitch made; you can now pull all the loops off the broomstick).  *Working through the same 5 loops, 5 sc through the broomstick hole.  **Place hook through next 5 broomstick loops.  5 sc through all 5 of the next broomstick loops.**  Repeat from **to** one more time.  (15 sc, 3 broomstick lace clusters)

Repeat rows 2 and 3 six more times (7 rows of broomstick lace).

Rows 16-17: chain 1, turn.  sc in each sc across.

Row 18: chain 2, turn.  dc in each sc across.

Row 19: chain 1, turn.  sc in each dc across.

Fasten off and weave in ends.

Sew buttons evenly across starting end of the cuff on the right side.  Buttons should be small enough to fit through holes between the double crochets at opposite end.