Thursday, January 30, 2014

Brooklyn Gauntlets/Armwarmers

Crochetdreamz designed the original pattern for the fantastic Brooklyn Fingerless Mitts.  Here are my amendments to the pattern to make gauntlets.


Using an H hook, follow the rib pattern for 7", as written.  Join the ends, then continue to make R1 (sc around the edge).  At this point, switch to an I hook, and follow the pattern for R2-4.  Repeat R4 for 26 rounds total (or as desired to base of thumb).  Switch back to H hook.  Complete pattern as written to the end.


Love these, but don't want to make them?  Pick up a pair in my Etsy store!


Monday, January 6, 2014

Herringbone Loop

Herringbone Loop 1Herringbone Loop


Want to make this with a group?  Join the class at Yarns Unlimited on January 25, 2014 at 10:30am.


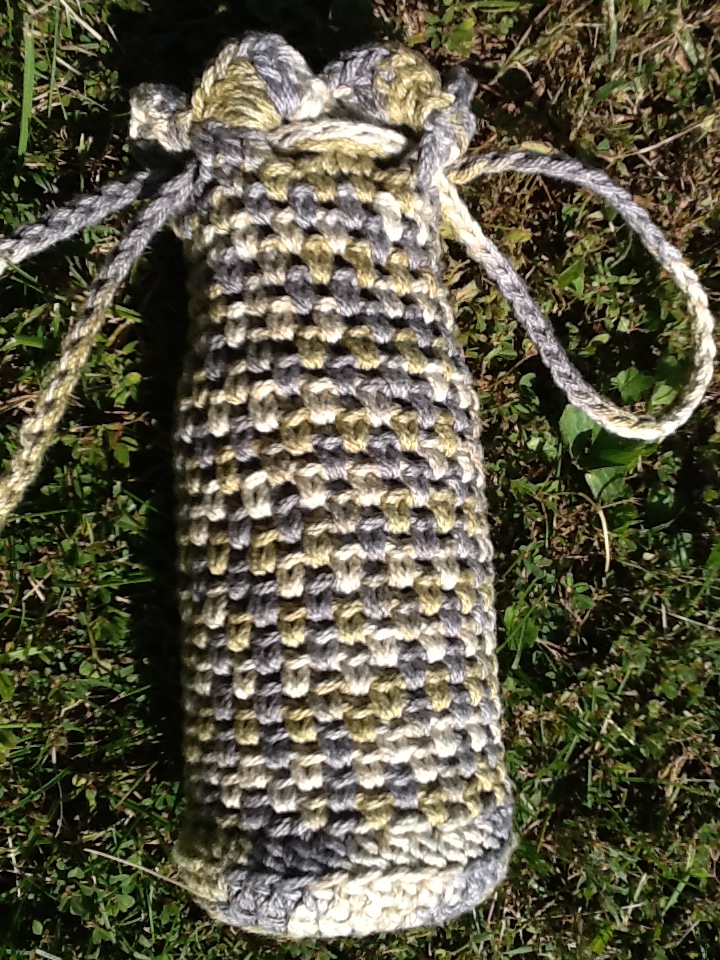
This stitch produces a beautiful herringbone pattern—hence the name!  A variation of double crochet, this is a delightful and simple project for beginning crocheters readyHerringbone Loop 2 for a new step.


You’ll need:

  • 1 skein of Ella Rae Mega, or 140 yards super bulky yarn or roving

  • Size Q crochet hook

  • Tapestry needle (for weaving in ends)


Finished Measurements

63” long, 5” wide

Gauge

4 rows = 5”

4 stitches = 4” in herringbone stitch

Pattern Notes

  • Herringbone double crochet (hbdc): yarn over, place hook n the next stitch, yarn over, pull through the stitch and 1 loop on hook, yarn over, pull through one loop, yarn over, pull through two

  • You can find an excellent tutorial for the hbdc at http://www.mooglyblog.com/herringbone-double-crochet-hbdc/

  • You may be tempted to work this in the round, but the herringbone angles will not show in the same way as when worked back and forth.

  • Hbdc usually has a chain 3 between rows.  This pattern uses only two chains between rows because the seam will be put through the ends.


Crochet the Loop

Chain 61 loosely!

Row 1: Hbdc into the top loop only of the 3rd chain from the hook and the top loop of each chain across.  (see video tutorial here to see exactly which loop is the top loop)

Row 2: Ch 2, turn.  Hbdc in each stitch across.

Repeat row 2 two more times.  Tie off, leaving a 12” tail.

To create a moebius seam (a twist), align short edges, turn one end over, then seam together with the tail.

Weave in ends, block, and wear!

2013 Slippery Woods Designs by Sara Farmer.  Pattern may be used freely, but please include a link or notation back to slipperywoodsdesigns.com Herringbone Loop 5

Saturday, November 2, 2013

Water Bottle Carrier

tote5Water Bottle Carrier

This striking carrier adds practicality  and style to your water bottle.  Use either one drawstring strap over your shoulder or both around your wrist.  No more water bottle sweat in your purse!  Convenient to carry and a breeze to whip up!

You’ll need:

  • 1 skein of Fantasy Naturale, or aran weight yarn of your choice (plant fiber recommended)

  • Size H crochet hook

  • Stitch markers

  • Tapestry needle (for weaving in ends)


 Finished Measurements

8.5” tall, bottom = 3.5” diameter

Gauge

Pattern: *1 sc, ch 1* repeat.  Make sc in ch 1 space of previous row.

4” = 7 [sc, ch 1] of mesh pattern

4” = 15 rows of mesh pattern

Pattern Notes

  • In a reverse slip knot, the tail of the yarn tightens the loop.  Do this by: 1) reversing the way you normally tie a slip knot, or 2) pull the tail through to complete the final step, rather than the working yarn.

  • Hdcbl = half double crochet through the back loop only of the stitch


 tote4Crochet the Base

1. Make a reverse slip knot (see pattern notes) or magic ring.  Draw up a loop through the center of the slip knot or ring.

2. Hdc 12 into the center of the knot or ring, join to 1st hdc with a slip stitch.  Tighten the ring.  (12 sts)

3. Ch 1, hdc in st below (1st stitch from last round), *2 hdc in next st, 1 hdc in next; repeat from * to * around, ending with 2 hdc in last st.  Join to 1st stitch with a slip stitch.  Place a marker, and continue to move it at end of each round.  (18 sts)

4. Ch 1, hdc in st below, *1 hdc in next st, 2 hdc in next st, 1 hdc in next; repeat from * around, ending with 2 hdc in last st.  Join as above.  (24 sts)

5. Ch 1, hdc in st below,*1 hdc in next 2 sts, 2 hdc in next st, 1 hdc in next; repeat from * around, ending with 2 hdc in last st.  Join as above.  (30 sts)

6. Ch 1, hdc in st below,*1 hdc in next 3 sts, 2 hdc in next st, 1 hdc in next; repeat from * around, ending with 2 hdc in last st.  Join as above.  (36 sts)

7. Ch 1, hdcbl in each stitch around.  Join to 1st stitch with a slip stitch.

Body

1. Ch 1, *sc, skip 1 stitch, ch 1; repeat from * around.  Join to 1st stitch as above.

2. Ch 1, *sc in ch 1 space below, skip 1 st, ch 1; repeat from * around.  Do not join.

3. Continue to work step 2 of mesh pattern around in a spiral until work measures 7.5” from base.  (Option: To fit a wine bottle, keep crocheting body longer.)

 Drawstring Eyelets

Ch 2, 1 dc in next 2 sts, ch 2, skip 2, *1 dc in each of next 3 sts, ch 2, skip 2; repeat from *.  Join with a slip stitch to first ch 2.

 Scalloped Top

Skip 3 dc.  *sl st 1 in next ch 2 space, work [3 dc, ch 1, 3 dc] in same ch 2 space; repeat from * around.  Sl st to 1st sl st to anchor.  Break yarn and finish off.

Straps

1. Ch for 36 inches.  Do not break yarn.  Weave chain through the eyelets of the bag.  Join chain with a sl st to work in the round, (be careful not to twist).

2. Sl st through back bump of each ch around.  Finish off.

Weave in ends, wet, and block around a bottle.Tote1

tote3tote6


© 2013 Slippery Woods Designs by Sara Farmer.  Pattern may be used freely, but please include a link or notation back to slipperywoodsdesigns.com


Wednesday, October 23, 2013

Tunis Wrap

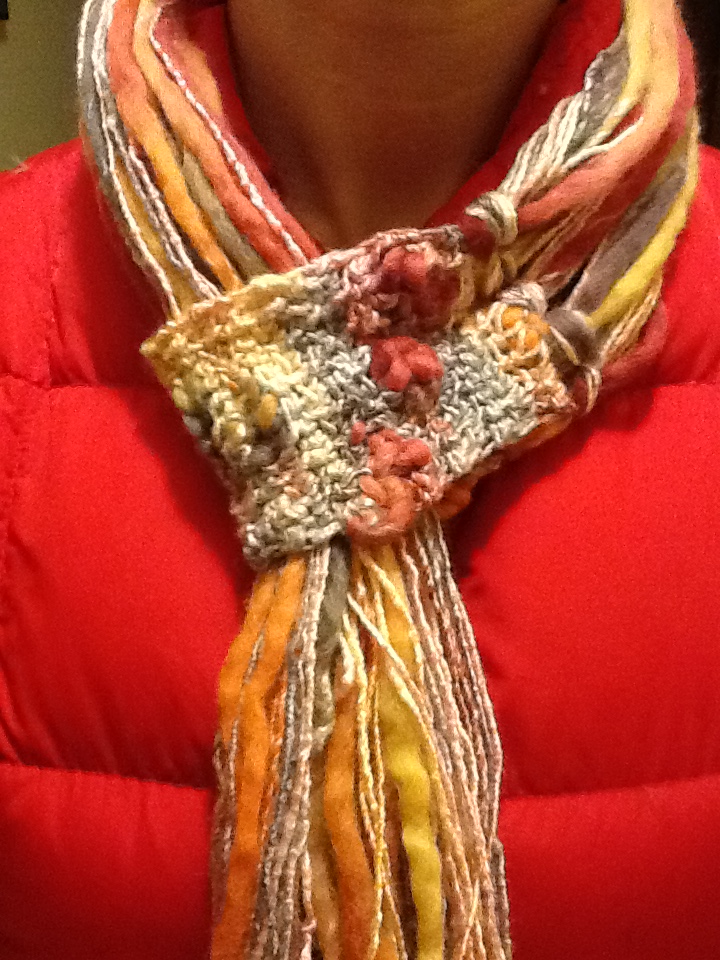
Tunisian crochet - the knitter's crochet!  This wrap is the Tunisian Resolution scarf pattern by Cathy Johnson of Cat's Tale.  You can find the original pattern here.  Here are my adaptations to convert the lovely scarf into a dazzling wrap.

You'll need:

- Size L crochet hook with extended cable

- 3 skeins Cleo by Plymouth Yarn, 100% mercerized cotton  (or 375 yards DK weight yarn of equivalent fiber)

Adapting the Measurements

- Gauge: 3 pattern repeats = 3.5"

- You will make 10 pattern repeats.  Therefore, chain 43 to begin (10 x 4 + 1 + 2).

- Finished measurements: 45" long, 11.5" wide

- Once you've reached 45", bring edges together with a twist.  (turn one end upside down)  Seam together with a backstitch seam.  (See tutorial here.)

You can also double this around your neck for a full and gorgeous cowl.

Tuesday, October 8, 2013

Bloomingtails Scarf

Bloomingtails 2BloomingtailsBloomingtails3


This simple design capitalizes on the innovative beauty of the Bloom yarn.  The yarn does the work for you!  Crochet this striking scarf in one relaxing evening.


You’ll need:


  • 1 skein of “Bamboo Bloom Handpaints” by Universal Yarn

  • Size I crochet hook

  • Tapestry needle


Finished Measurements


40” long, 3.5” wide (tube)


Pattern Notes


  • You will crochet a strip, then seam it together to form a tube.  Then you will attach fringe to the seam.  To wear, pull the fringe through the tube.

  • The tube is crocheted in linen stitch.  To make the linen stitch, you will alternate crocheting in the back and front loops of the stitch.


Abbreviations


  • Ch: chain

  • Sc: single crochet

  • Blsc: crochet through the back loop only of the stitch

  • Flsc: crochet through the front loop only of the stitch

  • St: stitch


Crochet the Tube


1. Chain 15.


2. Sc in each stitch across (14 sts)


3. Ch 1.  *blsc in next st, flsc in next st.  Repeat from * to end of row.  Turn.


4. Repeat row 3 until piece measures 8”.


5. Seam short ends together, creating the tube.


Make the Fringe


1. Cut 50 pieces of yarn 2 yards long.  (I find it easiest to cut a 2 yard piece of different yarn to use as a template.)


2. Attach fringe in 5 groups of 10 pieces evenly spaced across the seam of the tube.


3. Knot the end of each piece of fringe for a more finished look.


Block, wrap around your neck, and pull fringe through the tube.  Luscious and easy!


Click Bloomingtails Scarf here for printable version.

Wednesday, September 25, 2013

Cavalier Scarf Class

Cavalier Red


Planning to make this scarf?  Come join with others!  Tuesday, October 8th, 6-7:30, $10.  Learn more at yarnsunlimited.com/classes.html.  See you there!